
API (Application Programming Interface) is also known as Web Services. A developer must have the knowledge of API to be a good programmer. When you develop an application for different platforms like the web and mobile, you need to develop an API for the mobile developer. There is a various usage of API but we will mainly focus on building a REST API.
I hope you are already familiar with Laravel and know about creating basic operations in laravel. If you want to learn how to create CRUD application in laravel, I recommend you to read this article.
API Types
There are two types of API i.e. SOAP and REST. SOAP stands for Simple Object Access Protocol whereas REST stands for REpresentational State Transfer. Here, we will create a REST API in Laravel.
HTTP Methods
Before we dive into coding, we need to understand HTTP methods that we are going to use in our code. There are several types of HTTP methods but we are going to use GET, POST, PUT and DELETE. You can get a detail information from wikipedia, but I am summarizing them as below.
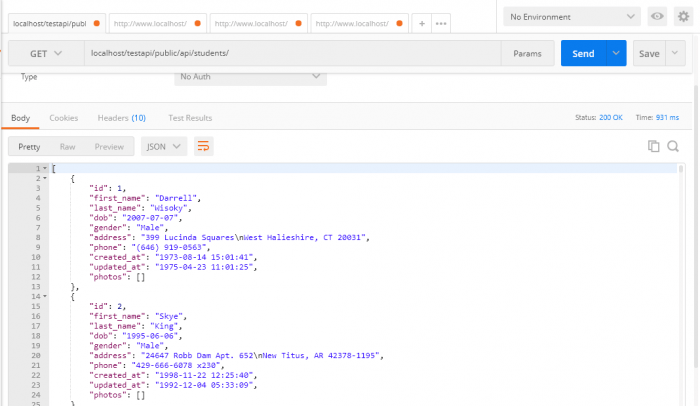
GET method is used to retrieve information from the server. It is considered safe because it doesn’t modify data on the server. For example, you have a route /students with get method, then you should get a list of students.
POST method is used to send information to the server. For example, when we submit forms during user registration, we use POST method to send information to the server.
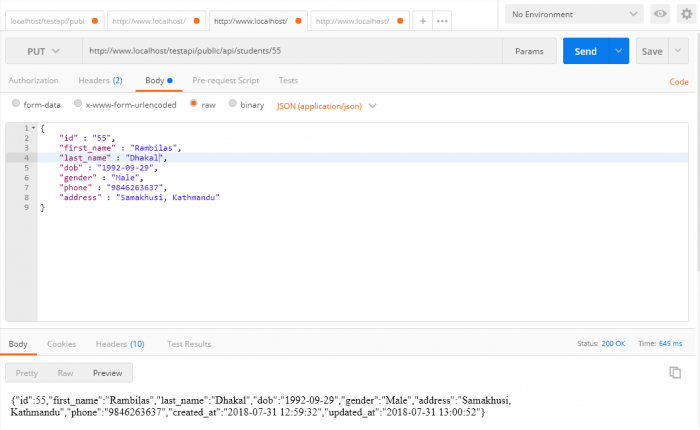
PUT method is used to update any information on the server. For example, when a registered student information needs to be changed, we use PUT method to update the information with new data that needs to replaced.
DELETE method is used to delete any record from the server.
API Resource
We will be using API resource for this article. API resource was introduced in Laravel 5.5 which ease the API development process. API resources present a way to easily transform our models into JSON responses. Thus, API resource acts as a bridge between Model and JSON response.
What we are building
We will build an API for student registration system. First of all, we will register a new student, list all students, update registered student and delete the student.
Create Project
To create an API we will create a fresh project. Let’s run below command to create laravel 5.5 project. You can specify the version when you create your peject.
composer create-project laravel/laravel=5.5 kodementor
Setup Database
Now, rename .env.example to .env and set up database according to your need. My setup looks like below
    DB_CONNECTION=mysql
    DB_HOST=127.0.0.1
    DB_PORT=3306
    DB_DATABASE=testapi
    DB_USERNAME=kodementor
    DB_PASSWORD=secret
Create Model, Migration
Now, cd into your project and open cli. You can use whatever you like but I recommend GIT Bash. So, You can a model and migration at once by running below code.
php artisan make:model Models\Student -m
Let’s open our migration and add some columns on our table. Our final migration looks like below.
public function up()
{
    Schema::create('students', function (Blueprint $table) {
        $table->increments('id');
        $table->string('first_name', 100);
        $table->string('last_name', 100);
        $table->date('dob')->nullable();
        $table->string('gender', 10);
        $table->string('address', 100)->nullable();
        $table->string('phone', 100)->nullable();
        $table->timestamps();
    });
}
I like to put all the models into the Models folder just to make it organized. It doesn’t matter where your place your file as long as you give right namespace. Now, open up your model and make the required changes. Our final model has the following code.
Since, we have already setup our migration, lets migrate our database. To do so, run the command.
php artisan migrateDatabase Seeding
We will populate our database using Faker. You don't have to worry about it, laravel comes this greate library. Let's create a seeder.
php artisan make:seeder StudentsTableSeederThis will create a seeder file inside
database/seeds/. We will populate 50 students.insert([ 'first_name' => $faker->firstNameMale, 'last_name' => $faker->lastName, 'dob' => $faker->dateTime, 'gender' => 'Male', 'address' => $faker->address, 'phone' => $faker->phoneNumber, 'created_at' => $faker->dateTime(), 'updated_at' => $faker->dateTime() ]); } } }Include this newly created seeder file inide run() function in
seeds/DatabaseSeederfile.public function run() { $this->call(StudentsTableSeeder::class); }All setup for seeding. Let's populate database by running command:
php artisan db:seedCreate Student Resource
Let's create our resource to transform our models into json.
php artisan make:resource StudentThis will create a file under
app/Http/Resourcesdirectory. Open up the newly created file and make some changes. You can define which attributes to return on api respons. I have return all columns of my table. You can remove some of the columns to test and play around.public function toArray($request) { //define which attributes to return on the response return [ 'id' => $this->id, 'first_name' => $this->first_name, 'last_name' => $this->last_name, 'dob' => $this->dob, 'gender' => $this->gender, 'address' => $this->address, 'phone' => $this->phone, 'created_at' => $this->created_at, 'updated_at' => $this->updated_at ]; }Create Routes
It's time to setup our routes. Laravel makes it easy by separating routes for API and WEB. All the web routes resides in web.php whereas all API routes stays inside api.php insides routes directory.
We need to giveroute structure for api. Open api.php file and add a route resource/api/ Route::Resource('students', 'StudentController');Create Controller
Let's create a controller by running command.
php artisan make:controller StudentControllerOpen up your controller and add some codes for listing, updating and deleting students. My final StudentController looks like below:
student = $student; } /** * show all student record * @return [type] [description] */ public function index() { return $this->student->with('photos')->get(); } /** * show single student detail * @param integer $id [description] * @return json [description] */ public function show($id) { try { return new StudentResource(Student::find($id)); } catch (\Exception $e) { return response()->json(['message' => $e->getMessage()], 404); } } /** * store new student record * @param Request $request [description] * @return [type] [description] */ public function store(Request $request) { try { $student = $this->student->create($request->all()); } catch(\Exception $e){ dd($e->getMessage()); // error } return response()->json($student, 201); } /** * Update single record * @param Request $request [description] * @param integer $id [description] * @return [type] [description] */ public function update(Request $request, $id) { try { $student = $this->student->findOrFail($id); $student->update($request->all()); return response()->json($student, 200); } catch (\Exception $e) { return response()->json(['message' => $e->getMessage()], 404); } } /** * delete a single record * @param Request $request [description] * @param integer $id [description] * @return [type] [description] */ public function destroy(Request $request, $id) { try { $student = $this->student->findOrFail($id); $student->delete(); return response()->json(null, 204); } catch (\Exception $e) { return response()->json(['message' => $e->getMessage()], 404); } } }We return json format data with different response code.
200 OK- Standard response for successful HTTP requests.
201 Created- The request has been fulfilled, resulting in the creation of a new resource.
204 No Content- The server successfully processed the request and is not returning any content.
404 Not Found- The requested resource could not be found but may be available in the future. Subsequent requests by the client are permissible.Now, we have successfully created our first REST API for student registration. We can test our api in POSTMAN. POSTMAN is an amazing application for testing APIs. Postman is a Google Chrome app for interacting with HTTP APIs. It presents you with a friendly GUI for constructing requests and reading responses.
Testing GET request
Testing POST Request
Testing PUT Request


