
Artisan is the command-line interface (CLI) that is included with Laravel. It provide a lot of commands that are helpful during application development. We can simply check the list of available commands as like below:
php artisan list
Artisan commands are really helpful as they automate the task. Some of the most common laravel default artisan command are php artisan serve, php artisan make:controller ControllerName, php artisan make:model ModelName -m and so on. In this article, we will create our own artisan command.
Let’s get started.
Install Laravel & Setup
We will start with the fresh laravel installation. We will use composer to create project by running the following command.
composer create-project laravel/laravel custom-command
After creating project, let’s do some setup. Create new database and put required credentials in .env file. Moreover, laravel comes with default migration for users table and password_reset. Let’s migrate to create the tables.
php artisan migrate
We are going to count the number of registered user in one day, let’s populate our users table using tinker. If you are new to tinker, you can read How to use Tinker in Laravel Application. To seed database, run the below command in tinker shell:
factory(App\User::class, 20)->create();
We will also setup our mail driver to send mails. We will use mailtrap.io for this. I have included the process of setting up mailtrap in our system in other articles too. You simply need to get username and password and add to you .env file as below:
MAIL_DRIVER=smtp
MAIL_HOST=smtp.mailtrap.io
MAIL_PORT=2525
MAIL_USERNAME=fc9a757ae48a54a
MAIL_PASSWORD=131ae2f702b46f4
MAIL_ENCRYPTION=null
Creating new Command
Laravel provides command to create own custom artisan command. Below artisan command will create a new command. Commands file are generally stored in App/Console/Commands directory but you may keep whereever you want.
php artisan make:command Count
This will create a new file under Commands directory. Here, protected $signature, protected $description are properties and handle() is a function. We will be changing these fields.
$signature |
Command to run |
|---|---|
$description |
Description of the command |
handle() |
This method is called when the command is executed |
Our basic command file looks below:
Now, if you run the
php artisan listcommand, you will be able to see the newly created command.
After creating it, we need to register it in
kernel.phpto be able to use. For this, open up your kernel.php file and add the following code.Now, let's add a small output in
handlefunction to test if our code is working. Thus, our handle function looks like below:Now, we have successfully created our custom artisan command. If we run the command
php artisan count:user, we will see the output as "This is a test output message".
We will use this command to count the number of users registered on that day. Since during our setup, we already migrated our table and populated the database. Now, we simply need to change the above
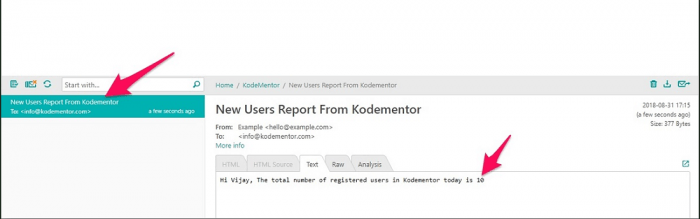
handlefunction so that our completeCountUser.phpfile looks like below:count(); // send mail to specified user Mail::send([], [], function ($message) use ($users) { $message->to('info@vijayrana.com.np/blog') ->subject('New Users Report From Kodementor') ->setBody('Hi Vijay, The total number of registered users in Kodementor today is '.$users); }); } }When we finally run our custom command, we will get a mail specifying total number of registered users today.
Additional Arguments and Options
Larave also provides us a way to define
argumentsandoptionsalong with custom command. Arguments are mendatory whereas options are optional. All arguments and options are wrapped inside curly braces.We can define arguments like below:
protected $signature = 'count:user {user}';Moreover, arguments can be set to optional or optional with default value.
// Optional argument... count:user {user?} // Optional argument with default value... count:user {user=foo}Similarly, we can define options by giving two hyphens
(--)along with the command.protected $signature = 'count:user {user} {--queue}';We can also define option that expects a value. For this, user must specify value with
=sign.protected $signature = 'count:user {user} {--queue=}';Another great feature is that we can define array as an argument in the command. For this, we need to use
*sign.count:user {user*}We can also make our custom command user interactive using below option:
.... public function handle() { // Retrieving Input $userId = $this->argument('user'); // Prompting For Input $name = $this->ask('What is your name?'); // Prompting for input without visible input $password = $this->secret('What is your password?'); // Asking For Confirmation if ($this->confirm('Do you agree with terms and continue?')) { ... } // Auto-Completion $name = $this->anticipate('What is your name?', ['Mike', 'Dan', 'Bob']); // Multiple Choice Questions $name = $this->choice('What is your name?', ['Mike', 'Dan', 'Bob'], $defaultIndex); // Writing Output $this->info('Display this message on the screen'); // error(), line(), ... ... }Don't like writing code on CLI? Ok, no worries!, we can also execute artisan commands with out CLI. Instead we will define routes to execute our command. This is called Programmatically Executing Commands. You can also read about Artisan command outside CLI on this link.
Let's run our custom made artisan command programmatically. To do this, we need to add a route. We will add a custom route in web.php file.
// Count total users on this data Route::get('/count-user', function() { $code = Artisan::call('count:user'); return 'Please check you mail for report. Thank You!'; });Conclusion
Today we have learned about creating custom command in laravel. This is a simple process with few steps and can be really handy and useful during the development of our application. We also execute our custom command programmatically outiside our CLI. I hope you have got pretty clear idea about creating custom command. You can also get more information from this documentation. If you have any comments or feedback, please feel free to drop a comment below.
Note: For source code, please refer to laravel-custom-command GitHub repository.


